
White vs. Color. I can't seem to decide. My old apartment was an obvious sway in the color direction, but I found myself coveting the tranquil white rooms that are all over my favorite design blogs.
While I still swoon over pics of those amazing airy spaces, three things have happened since. First, I moved into a new apartment with white walls. Ok, apartment-off-white walls, but still. Second, I realized I can't keep my place clean and organized 24/7, and the purest white walls and furniture just aren't going to look tranquil with all of what I've got going on. And third, I started to swoon over the most colorful pictures on those same blogs.
Now this, for better or worse, was my entry way. I love having an entry way for the first time in my renting life, but this sad scene wasn't cutting it. So I did what I thought any self motivated and determined young person would do - I upholstered it. Purple.
Inspiration and starch recipe found here. Yes, this makes a great big pot of goo, but I used a whole lot of it and it's not expensive.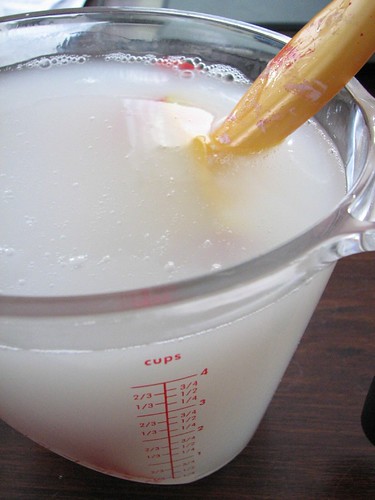
Step 1: Paint a bit of the wall with the starch. I slopped it on pretty thickly. Smooth your fabric up against the sticky section, leaving some overhang at all the edges. (The fabric will shrink as it dries, and you'll go back and trim it later.) Then paint again on top of that section of fabric, all the way to the corners, just to be sure everything is well saturated. I also used a couple of thumbtacks along the top to be sure the fabric would stay put, just because it was going to get heavy. 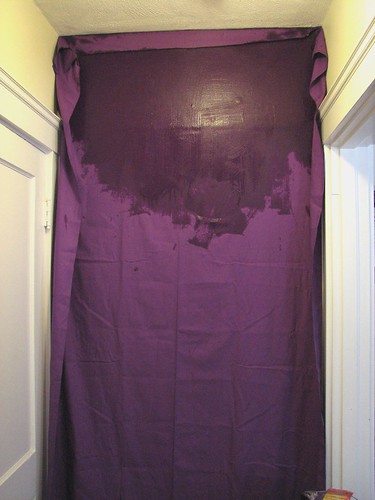
Step 2: Work your way down the wall in sections, painting the wall first, smoothing the fabric into place, and painting over the fabric. Don't worry if you need to pull up the fabric and adjust in spots. Just keep painting on the starch, and things will stick right back down.
Step 3: Let the whole mess dry. Trim along the edges with a utility knife. Enlist the help of a tall person, if necessary. Use more starch to paste those corners and edges securely onto the wall. It all dries clear, so touching up is not an issue. We had a hard time trimming around the woodwork, so we actually pasted on some extra patches to square everything up a little better. The patches just barely peek out from behind the main piece, and you really can't see they're there at all.
Step 4: Enjoy! The fabric pulls right off the wall when you're ready to move on. Supposedly you can then toss it in the wash and use it again for other projects. All the work involved took maybe 2 hours, from making the starch to trimming the edges, but I did leave it to dry overnight between steps. I bought 3 yards of fabric from Ikea for this wall. Total cost, under $10.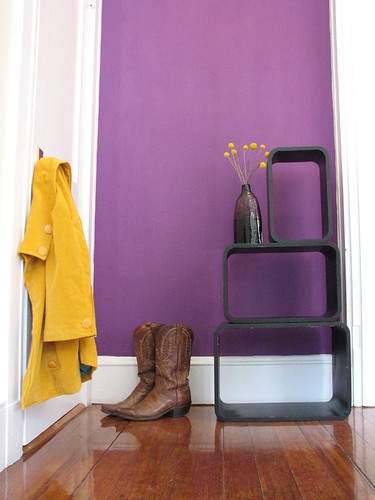
9.24.2008
Purple
![]()
Subscribe to:
Post Comments (Atom)


40 comments:
SO COOL! How's the texture? I'm totally going to do this (but with orange!)
Do yo think you could have soaked the fabric then put it on the wall and smoothed it out?
Hey Betsy! Yes, I do think soaking the fabric first would have worked. But I was a little concerned that it would get heavier and messier that way, and I would end up covered in starch. And the way I did it, once the top section was tacked in place and then pasted on, the whole thing went up and stuck really easily. I imagine soaking first is more like wallpapering, which is something I only watched my mom do once when I was really young. It probably works just fine! If you try it you'll have to keep me posted.
That is amazing, like seriously, amazing.
great! thanx for sharing :)
Oh wow, this is beyond awesome! Thanks for the pictures, too!
beautiful! thanks for sharing this...i'm renting and have a fixed wardrobe with frosted mirrored doors. dya think if i used this process the fabric would come off ok without damaging the mirror frosting? xx
Thank you for the pictures! You've just eliminated all my fears of this project (and it's a good thing too because the wallpaper in my rental is terrible!)
Beautiful job!
Love the picts - purple is my fav!!! I have a hand painted Winnie the Pooh mural my mom and I did and I refuse to paint over it. My daughter does not share the same sentiment. The mural is varnished, but I'm very nervous to wallpaper with fabric as I don't want the mural to get ruined.... how is it pulling the fabric off when you are ready to change again?
Thank you!!!
Hey, I just moved into an apartment with a big white cement brick wall... its not terrible looking, it just doesn't go with the décor I'm going for. Do you think this method would work with cement?
This is amazing! I have been wanting to do the fabric wallpaper on my wall at school. You mentioned that you used thumbtacks to hold it up.. Unfortunately, my walls are cement.. Do you have any other ideas of holding it up while it dries?
Use 3M Command Poster strips in the top corners. They can be pulled off the walls when you remove the fabric.
Amazing
Here is the wall that I did!
http://what-jamaican.blogspot.com/2014/08/office-makeover-part-1-wall.html
So when you pull it off it comes off completely clean? No residue or anything left on the wall?
Great idea! I worry, though, that such a dark color on a white surface will stain the wall. Does this happen? And if so, is there a way to protect the wall?
Concerns: What type of paint is on the wall. Flat paint shows damage from water which is why a semi gloss is used in bathrooms and kitchens. Most military housing, dorm rooms (like Anonymous above) and rentals use semi gloss throughout because it is washable, durable and water resistant. On the starch recipe link, they used this process on a door, which are usually coated to make them washable. If you can't wash your walls with water, this will probably ruin them. I don't think a satin paint would be a good idea either as it is for sheen, not durability or washability. If this soaks into the sheet rock through the paint, it will break it down and for a whole wall the only fix is replacement.(our sheet rock replacement was $25 per square foot ten years ago including labor and finishing from a water leak)
If I were to do this, I would first only try it over semi or high gloss and test a small area (inside a closet) with by spraying it with water. For the fabric I would use something lightweight and washable using 1/2 c of vinegar in the wash cycle for colorfastness and drying it to shrink it and for further colorfastness (sheets are usually preshrunk and colorfast but cut fabric from the fabric store is not), then take a small bit and soak it in this mixture and lay it on a piece of paper overnight to make sure it did not discolor. I would also put a small amount of the starch on the wall where it would not show and see what happens overnight (a small water spot, quarter size, in a closet is not a big deal and can usually be painted over). I would not expect a wall painted with a semi or high gloss would stain from the fabric if the fabric is washed and dried and I don't think the starch mixture would harm it either. To help support it while it dries, I think tacking it to the ceiling very close to the wall is a better option than on the wall because the holes are harder to see in my opinion or use poster putty.
Has anyone done this on a wall with flat/satin paint?
When you remove it does it stain the wall? How hard is it to clean the startch? Does it effect the wall if it does get painted
Wow, that'S really awesome! :)
I'm gonna try this in my new apartment! :)
xoxo, karie
We are looking to move into a new rental home and I love this idea!!! But my question is, will it stain the walls underneath? I don't want to get in trouble with the landlord for staining their walls lol
How well would this hold up to moisture if I were to do this in a bathroom?
What type of fabric did you use? do you know if it was cotton? Or a blend? I'm guessing it did not stretch at all as you worked with it.... Did you have to deal with any seams in the fabric, and how did you get it to blend together at the seam? ( if you dealt with one on this project)
Thanks
Hi, I've pasted red color cotton cloth on my living room's wall using sta-flo starch,and now there appears several white patches on the wall, please advise what shall i do to get rid of the patches. Thanks, Ashwini.
I am going to have to try this. Would be perfect for decorating a dorm room if it truly is non-destructive. How amazing!
It comes off easily however you will need to wash the wall to remove the starch residue. It's easy though, just use a little Dawn dish soap in a bucket for the first pass and clear water to rinse. It doesn't take any scrubbing. Like many former military families we'd used this method to personalize our housing. A hint to save money: sheets bought at thrift stores and dyed work wonderfully! We had Ombre walls once because we only has a small bucket to dye the sheet before Ombre was a fashion trend. It was gorgeous!
I started this project on a large wall I have in my rental studio. The wall needed five vertical panels to be covered, which I am overlapping because the stretching ends up with the seams not being straight (all good). I put up one panel and then ran out of the extra liquid starch I had on hand. Unfortunately, When I went to put up the next panel, the joints where I got fresh liquid starch on the fresh panel dried with whitish stains that look like excess starch that the fabric cannot absorb, and which dried flakily on the top of the fabric. I have thought about doing a lite coat of starch over everything to simply make all the stains "even" or rollering it with water to try to wash it out but am not sure if that will dissolve the starch or leave me with a new set of stains. Ultimately, I can always remove them from the wall, wash them, allow them to dry, and then rehang them but Its a lot of work, and this will likely happen again since I will still have overlap. Has anyone else had this problem and devised an on-wall solution? Or have thoughts on my current theories?
Thanks!
Hi, I love what you did with this fabric. Would it work on wallpaper? Ceramic tile? In a bathroom? Are there any restrictions on fabric to use? Looking forward to hearing from you.
This is great to use for those who rent their homes... Military families used it a lot seeing how you could not really paint the walls but this way you could have some color to your room ... without having to repaint to its original old white or off white...
Isn't it a fire hazard?
You could paint a design on the material too, if you wanted!
Hi, do you think this technique would work on a wood panel?
Good points
Did u ever find out what would happen?
I would think that it's no more a fire hazard than traditional wallpaper or other fabric based adornments????
I was wondering that too--
We're taking over my parents' home and they won't let us fix/update ANYTHING (hence my visiting the page for temp decorating tips/tricks/hacks, lol)...
What do you do if/when the wall gets dirty???
Do you have to pull it all down to wash and put it up again (so it doesn't dissolve, wrinkle, "crust" the original layer of starch)???
Dear Worried but Interested Commentators,
I have tried this fabric "wallpaper" with homemade starch (I used cornstarch and water) at my house on a wall painted with flat/matte paint using a fairly heavy drapery linen fabric, and then I applied the same fabric to a brown varnished door. The results were outstanding!
Absolutely wonderful, and here's why this method works so well: it really is removable with a bit of warm water and won't damage the wall or wood underneath, the starch that soaks through or that you "paint" over top of the fabric gives it a protective coating that resembles a matte varnish, the fabric stays up once it's dry and it looks great. Personally, I suggest a more lightweight cotton fabric since it will be easier for you to hold up when wet with the starch. I've also tried lace on windows with this method and that works wonderfully well too. There's no need to soak the entire piece of fabric in the liquid as that will make installation very unwieldy, awkward, messy, and heavy. The thumbtacks to hold the top in place are a fine idea, but so is using less starch and holding it up while it dries, then moving on to lower sections. Use a very sharp utility/X-acto knife to trim the fabric and change the blade if you feel any tugging while you trim.
The downside to this project is the take-down - it's easy with a spray bottle and some rags in hand, but if you've ever cleaned up wet flour or cornstarch from a counter top, you know how sticky it gets. So, easy to put up and take down, but lots of rinsing and wiping to get all the starchy stuff off the wall when you take it down. Not a big deal, and no damage to the wall, but it involves some work.
Best of luck to all of you working hard to make your homes look beautiful - this idea is a winner.
How does this work on plaster walls that do not have a semi paint finish I live in a rental and I would like to spruce up these boring walls without damaging the walls.
Post a Comment